

Recommended Workflows for Podiatrists to Document MIPS CQMs
This article describes how podiatrists can document and report performance of MIPS clinical quality measures (CQMs) (formerly known as Registry measures). The recommended workflows apply to APMA MIPS app/Registry users and all other clinical registries. We use Quality ID 126 as an example.
NextGen® Office has partnered with the American Podiatric Medical Association (APMA) to provide our podiatrists a direct connection between our EHR and the APMA MIPS app/Registry. For more information about the APMA Registry, refer to the APMA Registry FAQ.
The APMA MIPS app/Registry supports many MIPS CQMs, including:
- Quality ID 126: Diabetes Mellitus: Diabetic Foot and Ankle Care, Peripheral Neuropathy – Neurological Evaluation (CMS PDF)
- Quality ID 127: Diabetes Mellitus: Diabetic Foot and Ankle Care, Ulcer Prevention – Evaluation of Footwear (CMS PDF)
As an example, if your patient qualifies for Quality ID 126, you must:
- Perform the Quality action: lower extremity neurological exam
- Document your exam findings
- Submit the appropriate code to report your performance of the measure. Report the code that reflects the situation (performance met or performance not met; or for other measures, denominator exclusion/exception).
Note: Applicable ICD-10 codes, CPT codes, and reporting codes are listed in the measure specifications (refer to Quality Payment Program website and select MIPS clinical quality measures (MIPS CQMs) for Collection Type.
Quality ID 126 Description
Percentage of patients aged 18 years and older with a diagnosis of diabetes mellitus who had a neurological examination of their lower extremities within 12 months.
Recommended Workflows
Document Lower Extremity Neurological Exam
Definition: Consists of a documented evaluation of motor and sensory abilities and should include: 10-g monofilament plus testing any one of the following: vibration using 128-Hz tuning fork, pinprick sensation, ankle reflexes, or vibration perception threshold; however, the clinician should perform all necessary tests to make the proper evaluation.
- In the encounter, click O on the SOAP menu and select Physical Exam.
- Enter exam findings either in the page notes or by using the body system buttons.

Document and Report Eligible Encounter during the Measurement Period for Patients 18 Years and Older
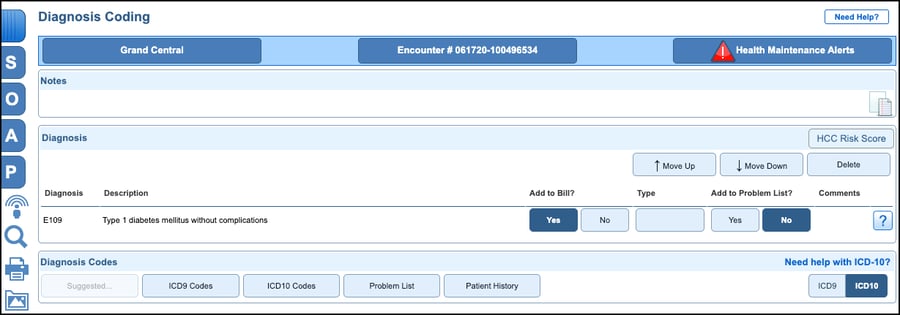
- In the encounter, click A on the SOAP menu.
- Search and select the appropriate diabetes mellitus diagnosis code.
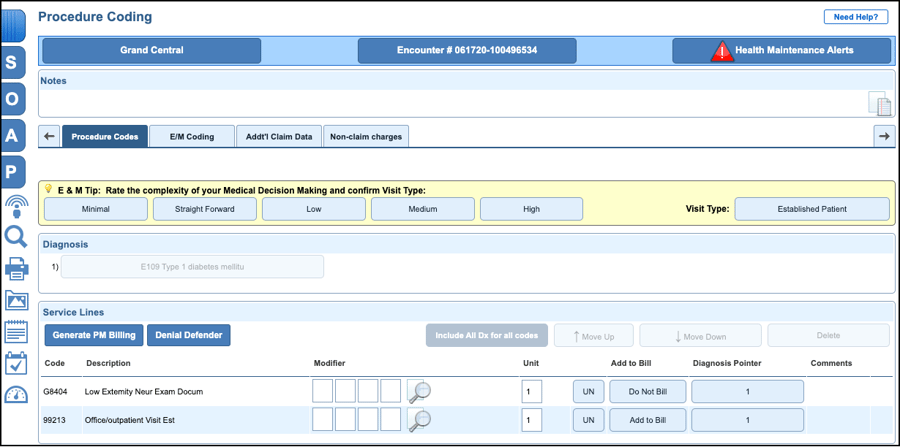
- Click P on the SOAP menu and select Procedure Coding.
- Search and select the appropriate code to report your performance of the measure. In our example, we select G8404 to indicate performance met.
- Below Add to Bill, click Do Not Bill (because you do not want the code to be sent to the payer, but you do want to send the information to the registry).
- Search and select the appropriate visit code.
PRO Tip – Use Blueprints as a Timesaver
One of the most powerful yet under utilized tools in NextGen Office is the Blueprint feature. You can use the Save as Blueprint feature to help conduct efficient visits and quickly document encounters. You can use this feature for any encounter and can save any part or all of the encounter summary that you used.
For example, this article presents a typical visit for a patient who qualifies for Quality ID 126 and can be saved as a blueprint for reuse.
Create a Blueprint
- Click the Encounter # within the current encounter.
- Below Manage the Encounter Content, click Save as Blueprint.
- Deselect whichever SOAP sections or notes that you do not want to reuse.
- Select a Body System (for this example, we select Neurological).
- In the Create a New Blueprint field (we use CQM 126) and Description.
- Click Create.
Use a Blueprint
- Within the new encounter, click Grand Central (where all blueprints are).
- In the Blueprints section, click the body system (our example uses Neurological).
- Click the blueprint name (our example uses CQM 126).
- Click Import.
- Click Preview Encounter.


