
The NextGen Office cloud based EHR/PM solution has many easy to use, intuitive software tools that help today’s overworked medical practices become more efficient and productive.
But today healthcare providers may face a possible dramatic increase in demand due to the widespread coronavirus outbreak. We thought that this might be a good time to review one of the most powerful NextGen Office EHR tools, the E-Visit or telemedicine feature included in the Premium Patient Portal.
An E-Visit is a virtual office visit between the patient and the provider using YourHealthFile® Patient Portal and NextGen Office EHR. In place of a face-to-face encounter, an E-Visit is conducted by videoconference, online chat, or phone.
Using E-Visit in the patient portal allows a busy provider to leverage their time and practice resources to see and screen a large number of patients. It’s also a great way to protect the practices frontline caregivers and other patients by reducing exposure to patients who may be sick.
In a recent article the CDC recommends leveraging telemedicine tools to help maximize healthcare resources and to direct patients to the right level of healthcare for their medical needs.
This post covers how to setup and use the NextGen Office E-Visit telemedicine system. We’ll cover the setup steps and also show you how both the provider and patient can use it.
Download Free EBook: Virtual Visits - Telehealth in Times of Crisis and Calm
Let’s Jump into the Premium Patient Portal!
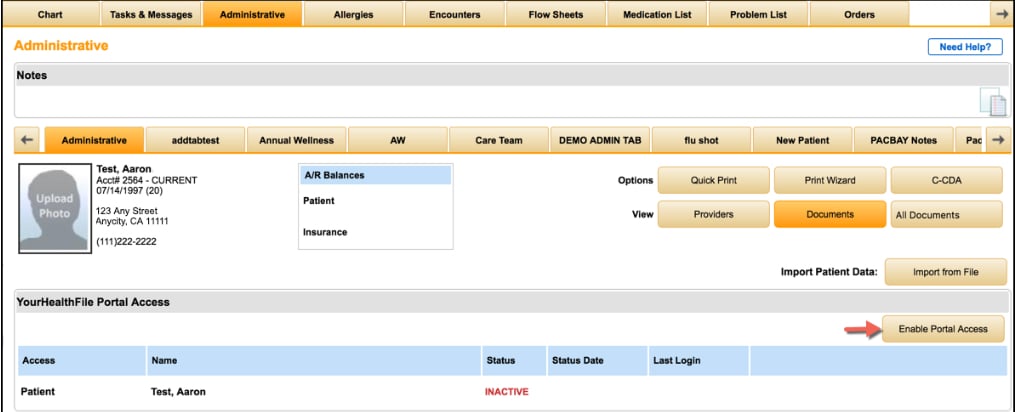
Step 1: Enable the E-Visit feature in Administration
Go to Admin>Premium Portal Management>Enable & Disable Features
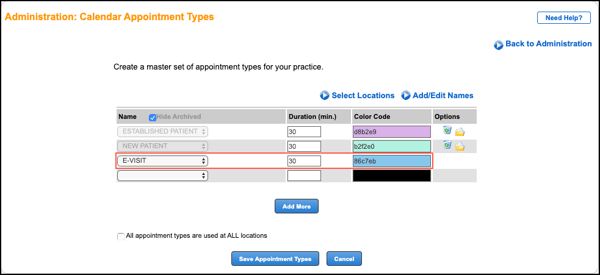
Step 2: Setup E-Visit as an Appointment Type
To schedule an E-Visit for a patient, you must add the system-provided E-Visit appointment type in Administration: Calendar Appointment Types.
Navigate to Administration: Calendar Appointment Types
From the menu bar, click Admin.
Below Practice and Users, click Calendar Appointment Types.
Add an E-visit Appointment Type
From the Name menu, select E-VISIT.
Enter the Duration.
Select the Color Code (optional).
Click Save Appointment Types.
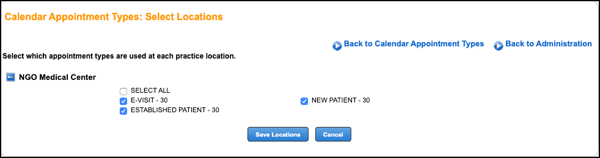
You are navigated to the Calendar Appointment Types: Select Locations page.
Select which appointment types to associate with your practice location.
Click Save Locations.
You’re now ready to start scheduling E-Visits for your patients!
Step 3: Using E-Visits as a Provider
The front office staff first schedules an appointment for the patient using one of the E-Visit appointment types that you created in Step 2 above.
The provider then starts the E-Visit when they open the encounter in NextGen Office EHR
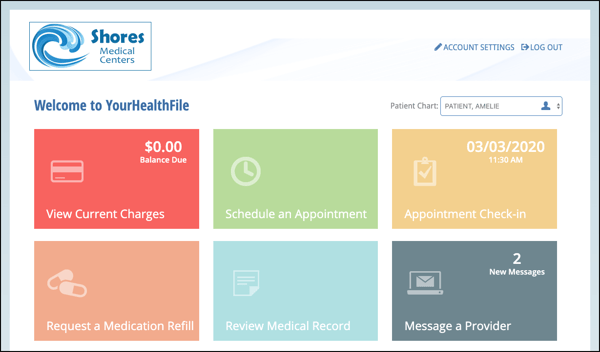
From the Patient Tracker view click the scheduled appointment time. In the example below notice that the appointment at 11:30 AM is of the type “E-Visit” - here you’d click the 11:30 AM block to start the encounter
The E-Visit screen then appears at the top of the Encounter Summary Preview. The provider appears on the left side of the screen and the patient appears on the right side.
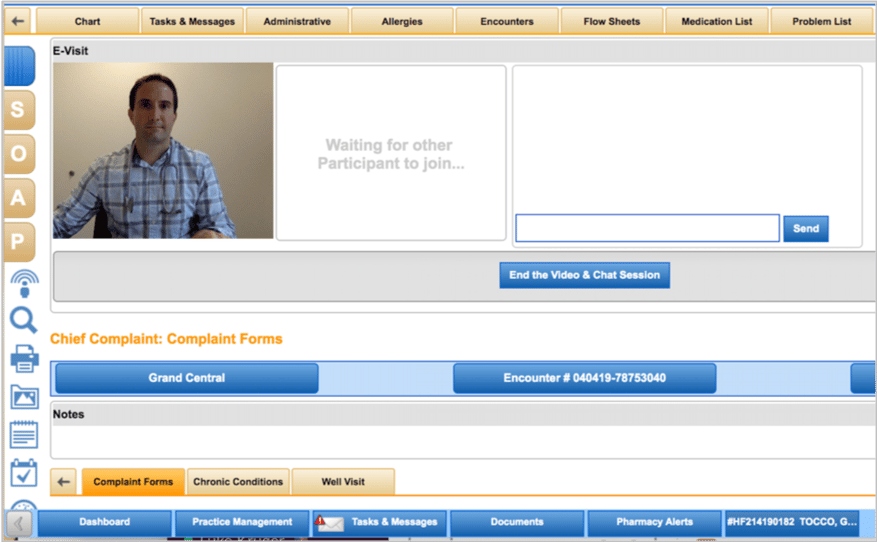
Calling the patient on the phone.
Using the on-screen microphone. Your browser may prompt you to allow access to your computer's camera and microphone.
Chatting online (enter questions/comments in the text box).
Providers can end the e-visit by clicking End the Video & Chat Session.
Using an E-Visit from the Patients View
The first step in a telemedicine visit from the patients perspective is to log in to your practices portal through YourHealthFile and check in to their appointment.
Step 1: On the home page they’d click Appointment Check in Tile
Step 2:
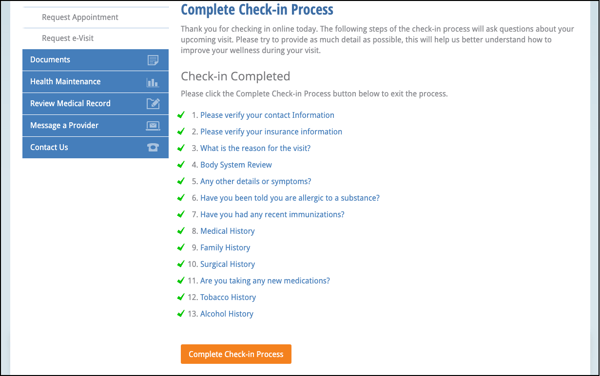
Patients can complete intake information before joining an E-Visit. Patients can use the navigation menu at the top of the page to review and fill out each form. They can also click a check-in process form link

Step 3: Click Complete Check-in Process
Once done filling in your forms they’ll click “Complete Check-in Process” at the bottom of the page
Step 4: The E-Visit then Opens
The e-Visit window opens. The patient appears on the left side of the screen and the provider appears on the right side.
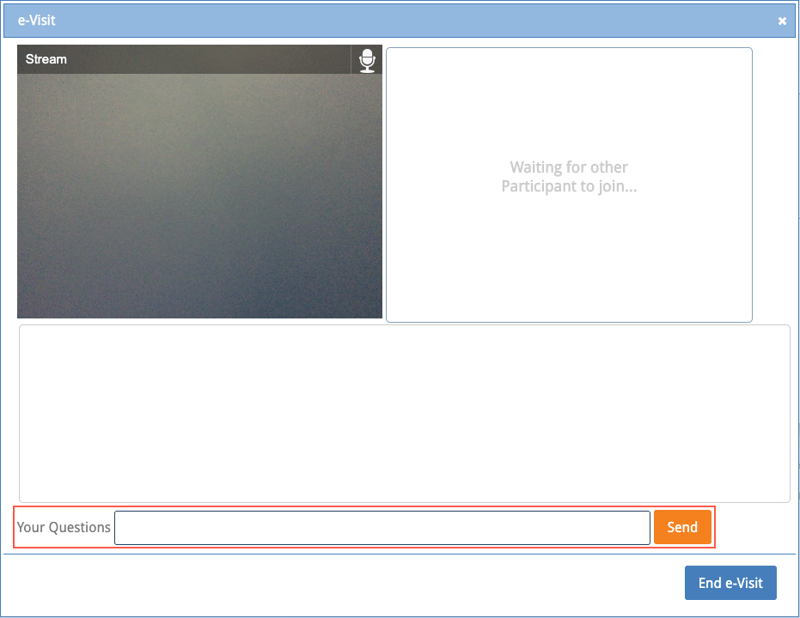
Patients can communicate with the provider by:
Calling the provider on the phone.
Using the on-screen microphone. Your browser may prompt you to allow access to your computer's camera and microphone.
Chatting online (enter questions/comments in the Your Questions text box).
Patients can end their E-Visit by clicking End e-Visit.
Patient demand for telemedicine or telehealth visits is steadily increasing, the recent and very real concerns about the Covid-19 coronavirus are further fueling demand and interest from patient’s. And this technology is allowing overburdened healthcare professionals to expand their reach and capabilities while protecting their staff and other patients.
During a recent telemedicine webinar we presented data on telemedicine reimbursement scenario, statistics on growing patient demand and the value proposition of offering telemedicine services. You can view a replay via the link above or download a copy of the slides here.
If you’d like to learn more about how the NextGen Office patient portal E-Visit feature can help your practice please click the link below.
Ready to learn more about how the NextGen Office Patient Portal can Help your Practice?